Leveling route

Gem pickups while you level.

These act-by-act screenshots now live on a dedicated page so you can follow the leveling path without digging through notes or build boards.

Act by act

The screenshot route, organized into cards.

The first four acts are now mapped into a layout that matches the leveling screenshots and leaves room to extend the route later.

Act 1

Open with Frost Blades and grab the first support links while the build is still simple.

Frost Blades

  • Added Fire Damage
  • Faster Attacks

Dash

  • Sniper's Mark
Act 2

Swap into Sunder and start layering movement, sustain, and the first reservation skills.

Sunder

  • Added Fire Damage
  • Ruthless

Leap Slam

Steelskin

  • Blood Rage

Blood and Sand

  • Herald of Ash
Act 3

Keep Sunder online and add the longer-duration buffs that support the leveling loop.

Sunder

  • Ruthless
  • Close Combat

Leap Slam

Steelskin

  • Blood Rage
  • Vulnerability

Blood and Sand

  • Herald of Ash
  • Determination
Act 4

Finish the setup shown in the screenshot with Fortify and the first explode-on-kill payoff.

Sunder

  • Ruthless
  • Close Combat
  • Fortify

Leap Slam

  • Faster Attacks

Steelskin

  • Blood Rage
  • Vulnerability

Blood and Sand

  • Herald of Ash
  • Determination

On Kill Monster Explosion

Passive tree

Act 2-3 tree snapshot.

This is the passive tree snippet you sent for the Act 2-3 leveling stretch, kept separate from the gem list so it is easy to follow while leveling.

Passive tree snapshot
Act 2-3 Passive tree snapshot

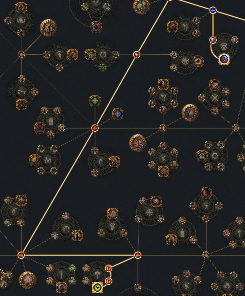
Use this tree while leveling through Acts 2 and 3, then keep extending toward the next cluster as the build opens up.

Next steps

Send the later-act screenshots when you have them and I�ll extend this route.

The leveling page is ready for more acts, transition points, or a final Flicker Strike swap section without changing the overall layout.